Chip carving is a difficult task if you have ever tried it. There are many methods and styles to choose from, but which one will you prefer? What tools will you need? I will be sharing my tips and tricks for carving chips. There are many essentials to chip carving success, regardless of whether you prefer traditional or modern style.
Traditional
Chip carving is one of the oldest forms of decorative woodcarving. This requires a straight-edged or offset knife. Chip carving involves making numerous small triangular holes in the wood to create a pattern. This art form evolved in different countries simultaneously over 1,000 year ago. Due to their widespread popularity, the designs were often very similar across nationalities making it hard to differentiate one from another.
The skills needed to carve wood became more popular as the practice spread around the globe. Chip carving is a popular method of decorating furniture in Sweden. In fact, there were even schools that taught the art. Modern chip carvers are able to benefit from the centuries-old skills and knowledge of carvers. Through the generations, knowledge was passed from carver to apprentice to student. It's an ongoing process that lasts for a lifetime.
Free Form
You've come to right place if you've ever wanted to learn chip carving. Murray Taylor has created a DVD that shows you how create both freeform and geometric carvings. It's a good introductory project and contains lots of useful information. English and NTSC versions of the DVD are available. You can also buy the DVD in widescreen or stereo. The owner of the DVD is Artisan Media Ltd., and it is available in MP4 format for Windows and Mac computers.
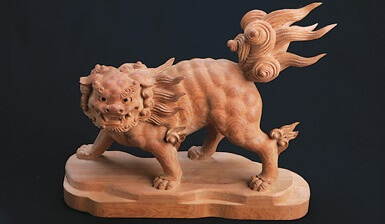
Triangles, circles, lines and lines are the fundamental shapes for geometric chip carving. This technique can be combined with different styles and shapes to create endless possibilities. This technique is also known by the free-form style of chip carving. You can make your chips look beautiful in any room, no matter whether they are a flower, a dragon or a tree. Free form chip carving can be an effective way to incorporate many different techniques into one piece.
Techniques
Chip carving is a tradition that has existed for many centuries. You can find examples in many countries around the globe. On paddles used for ceremonial purposes and boats in the South Pacific Islands, one example of chip-carving is found. These carvings were most likely done using bits of bone and sea shells, but some people have reported using shark teeth as well. This book will show you how to create amazing designs by using different chip carving techniques.
Chip carving is easy if you know how to follow a few simple techniques. The first of these is to know how to carve the fine triangle. This pattern is easy and straightforward to understand. To carve this design, simply carve different triangles and do it again. This does not mean your chip carving should be dull. You can make a variety of patterns by changing the triangles.
Tools
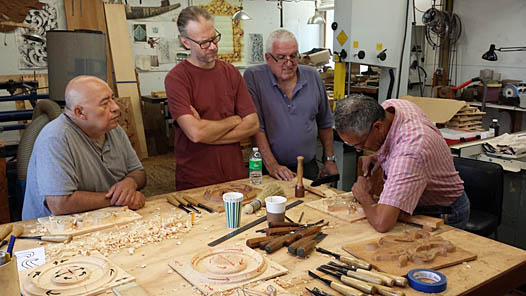
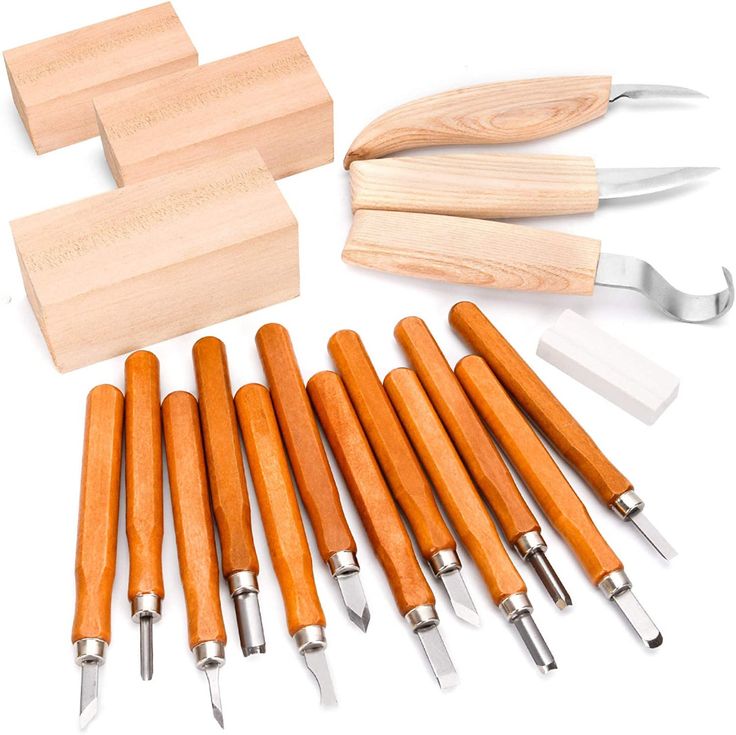
Lora Irish offers an online seminar for free that will cover the basics of chip-carving. She will show you how to use various carving tools, including a stab knife, chip knife, and detail bench knife. Irish will also be demonstrating the different types and uses of wood carving tools. Choose from the below list to find the right tool that suits your needs. These tools can be used to create simple designs and shapes, or more complex designs.
Special geometry is used to create a chip carving knife. It is about one half inch long and has a narrow, curved back edge. This makes it possible to make precise incisions. Also, it is important to pick a sharp point for the needle so that the edges meet perfectly. The chip carving knives are made from stainless steel with a sharp tip. A chip-carving knife should be sharp enough for cutting a small piece of wood.
Getting started
It is essential to learn about the methodology of chip carving before you begin. The method you choose will depend on the type and purpose of your carving. You should still be familiar with some principles in order to make sure your work is as precise as possible. The chip carving method involves making a pattern in the wood. These are the steps to create your first chip carving.
Sharpening a chip carving blade is crucial. The chip carving knife blade will have bevels either side. This means that it is a primary knife for chip carving. The sharpening rock is shaped as a diamond, and can produce effective edges. The stone should be placed at 10 degrees. It will also sharpen your chip carving knife as well as your chip carving tool simultaneously.
FAQ
How much money will I need to get started?
Because every project is unique, there aren't exact numbers. These factors will help you get an estimate of how much money is needed.
-
Material costs
-
Tools and equipment
-
Time spent working on this project
-
Your hourly rate
-
What profit are you expecting to earn?
-
Whether you plan to hire help
If you're just starting out, you may decide to start small by making simple items such as boxes and picture frames. As you gain experience, more difficult projects will become possible.
What is the average time it takes to finish furniture?
It all depends upon the size of your piece of furniture. A smaller project like picture frames or boxes can be completed in a single day. Larger projects like tables and desks take many days. It takes time to stain and seal the wood properly.
How much should a hobbyist invest to get started?
A lot of capital is required to purchase the necessary supplies and tools if you want to start your own woodworking shop. A good place to start would be by buying a small table saw, drill press, circular saw, jigsaw, and sanding machine. These items aren't very expensive, so you won't break the bank.
Statistics
- The U.S. Bureau of Labor Statistics (BLS) estimates that the number of jobs for woodworkers will decline by 4% between 2019 and 2029. (indeed.com)
- Most woodworkers agree that lumber moisture needs to be under 10% for building furniture. (woodandshop.com)
- The best-paid 10 percent make $76,000, while the lowest-paid 10 percent make $34,000. (zippia.com)
- Average lumber prices rose about 600 percent between April 2020 and May 2021. (familyhandyman.com)
External Links
How To
How to join wood without using nails
Woodworking is a popular hobby. Woodworking can be a fun hobby because you can work with your hands to make useful objects from wood. There are times when two pieces of wood need to be joined together. This article will explain how to do this so that your woodwork projects stay beautiful.
You will first need to trim the edges of your wood pieces before joining them. Sharp corners can cause problems down the line. Now you can start gluing the boards together.
When working with hardwood, glue should be applied only to one side. If you're using softwoods like pine or cedar, you should put glue on both sides. Press the boards down until the glue is fully incorporated. After applying the glue, let dry the boards before proceeding to the next stage.
Once you've glued your boards together you will need to drill holes in the joints to accommodate screws. The size of these holes depends on what type of screw you choose to use. For example, if your screw is a 1/2-inch wooden screw, drill a hole that is at minimum 3/4 inches deep.
After drilling the holes, you can drive the screws into your board's backside. You should be careful not to touch the board's front surface. This could cause damage. When driving the screws, try to avoid hitting the ends of the screws too much. This will prevent the wood from splitting.
After your project is completed, you will need to protect it from the weather. To do this, you can seal the entire furniture piece or just cover the top. You will want to choose a product that will be durable for many years. Examples include oil-based varnishes and polyurethanes, shellac, lacquer and others.
These products are available at most home improvement stores. Just make sure that you buy the right kind for the job. Remember that some finishes can be toxic, so you should not use them indoors. Protective gear should always be worn when handling these finishes.