Scroll saw patterns are a great way to learn how intricate woodworking projects can be cut. The scroll saw can also be used for other woodcrafting tasks, such as Hickory corbels or Lily-pad inspired boxes. In addition, this project can be used for memorial purposes or as a gift. The article below will help you understand more. If you have trouble deciding on a scroll saw pattern, check out the links below!
Free scroll saw patterns
If you are just starting woodworking, the Free Scrollsaw Patterns cross section is a great resource of inspiration. They offer everything from basic cuts for beginners to more advanced designs for the experienced scroll saw user. These patterns are great for creating fun and useful crafts for children. These are some of our most loved patterns:
One of the easiest and most popular types of scroll saw patterns is the tree. This design is extremely elegant and is a great choice if your goal is to create a woodworking challenge. These patterns can be modified to suit your personal tastes. Some are very simple while others are more elaborate and complex. This cross will bring elegance and class to any mantel or shelf. You can also use them to add rustic charm to your home or office.
A self-contained, simple pattern is another option. This project will require a lot work and requires many pieces of wood. However, it will increase your skills as well as help to release any nerve energy. A freestanding VW Beetle can be made. This is both a decoration and a quick exercise for your mind. The best part is, no one will know that you spent hours making it will still look good.
Lily-pad-inspired boxes
It's a great way for your garden to look better. The boxes are an ideal way to store extra potting soil. You can also add decorative accents like colorful ribbons. They make wonderful gifts. You don't even have to spend any money making them! Check out these scroll saw patterns and you'll be amazed at how simple they are.

These scroll saw patterns can be used by both beginners and experienced users. These can be used to decorate walls, on refrigerators or as suncatchers. You can download PDFs that provide instructions on how to use your scroll saw. And because scroll saw patterns are so versatile, you can make them as ornaments for your home, garden, or office.
Many free scroll saw patterns are now available. Beginners will enjoy cutting these patterns, while more experienced woodworkers can try more complex cuts. In addition to making beautiful crafts, these patterns are perfect for kids, as they are fun to make and can be displayed anywhere! You'll be proud to show off these beautiful creations in your home!
Hickory corbels
The sapwood of Hickory is lighter than the heartwood. It can stain beautifully and holds nails or screws with tenacity. Hickory is popular for making scroll saw patterns and it ages beautifully. It isn't suitable for outdoor usage due to its excellent bending capabilities. Three reasons to avoid hickory if you need it to withstand water.
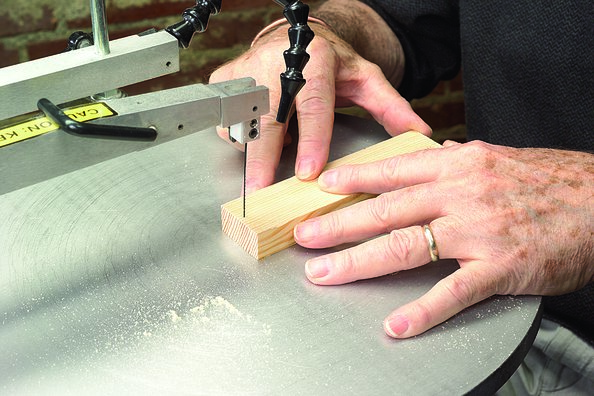
First, a scroll saw is necessary. The scroll saw blade is an excellent tool for making detailed curves. It's also a great tool for this type of project. The scrollsaw can also be used to make furniture and toys for children. These wooden toys can become a focal point of any room. Additionally, you can make them heavier by making them animals or humanoid.
A scroll saw can be a great tool to demonstrate your woodworking skills. You can make a corbel out of hickory and incorporate it into other projects. These projects make wonderful gifts for loved ones and add charm and beauty to any space. While they're easy to make, you will need patience. But if your scroll saw is available, you can either buy a pattern or make your own scroll saw.
FAQ
What is the difference between a hobbyist or a professional woodworker, and how can you tell?
Hobbyists like making things with wood. Professionals focus more on quality. Hobbyists tend to take pride and share their creations with family and friends. Professionals will spend hours researching designs before they begin working on a project. Professionals will be meticulous about all aspects of their work, from selecting the right materials to finishing it.
How much should a hobbyist invest to get started?
A lot of capital is required to purchase the necessary supplies and tools if you want to start your own woodworking shop. A good place to start would be by buying a small table saw, drill press, circular saw, jigsaw, and sanding machine. These items won't break the budget and aren't expensive.
What would be your first step in woodworking?
Start with softwood like pine, poplar and ash. You will feel more comfortable with these softwoods, so you can move onto hardwood.
What wood items do well?
These wooden products are the most popular. They were made from sustainably harvested wood.
Most furniture is made from oak, maple, mahogany or walnut.
These woods are extremely strong but also have beautiful colors and grain patterns. If they are well cared for, they can last many years.
To prevent moisture damage to wood furniture, it is important that it be painted before any other surfaces. All surfaces should be painted, including doors, drawers, and handles.
If you want to make sure that your furniture lasts as long as possible, then you should choose a paint that is resistant to water.
Followed by two coats, you should apply a quality oil-based primer. You may need to apply several coats of top coat depending on how much wear it is expected.
Avoid spray cans or aerosol colors. These products contain solvents which evaporate quickly and leave behind harmful fumes.
Statistics
- The U.S. Bureau of Labor Statistics (BLS) estimates that the number of jobs for woodworkers will decline by 4% between 2019 and 2029. (indeed.com)
- If your lumber isn't as dry as you would like when you purchase it (over 22% in Glen Huey's opinion…probably over 10-15% in my opinion), then it's a good idea to let it acclimate to your workshop for a couple of weeks. (woodandshop.com)
- In 2014, there were just over 237,000 jobs for all woodworkers, with other wood product manufacturing employing 23 percent; wood kitchen cabinets and countertop manufacturing employing 21 percent. (theartcareerproject.com)
- Overall employment of woodworkers is projected to grow 8 percent from 2020 to 2030, about as fast as the average for all occupations. (bls.gov)
External Links
How To
How to stain wooden surfaces
Staining wood is the process of applying chemicals to the wood's exterior, which alters its color. The wood will turn from white to brownish-red due to the chemical reaction. Although oak is the most popular type of wood to stain, there are many other types that can be used.
There are many options for applying stains to wood surfaces. Some methods involve mixing the stain with a solvent (such as turpentine) and then brushing or spraying the mixture onto the wood. Some methods involve a mixture of water and dye that is applied directly to the wood. You can mix stains into varnishes or paints to make them part of your finish coat.
The first step in staining wood is preparing the surface. To apply the stain, clean the wood completely. Sanding the wood smooths out rough spots and scratches. The next step is to determine the type of stain you would like to use. There are two main types of stain: non-penetrating and penetrating. Penetrating colors penetrate deeper into wood than those that are non-penetrating. This makes them more suitable for darker colors, such as mahogany. Light colors such as maple work well with non-penetrating stain.
After you've decided what type of stain to apply, get ready for your tools. A paintbrush works well for applying stains because it allows you to spread the liquid evenly across the surface. It is a good idea to have rags on hand in case you need them to clean up any stains that may remain after you have finished painting. If you intend to mix the stain yourself you will need enough containers to hold all the components.
After you have prepared your materials for staining, clean the area. Clean the area with soap and warm water to get rid of dirt and grime. You can wipe down the entire furniture using a damp rag with clean water. Make sure you eliminate any loose debris, especially if you plan to stain darker wood.
Apply the stain. Apply the stain by brushing or spraying it onto one side of the furniture. Work slowly and carefully, moving back and forth along the grain of the wood until you reach the opposite end. Be careful not to let the stain drip off the wood's edge. Before moving on to the next steps, allow the stain drying completely.
To protect the painted surface, apply a coat of clear polyurethane sealant. Apply three coats with polyurethane. Allow the third coat of polyurethane sealer to dry overnight before applying the final coat.