These tips are important to know before you start using your scrollsaw. They will help you use the saw safely and effectively. Also, make sure the scroll saw is securely screwed into the workbench. If it's not securely screwed into the workbench, vibration could cause it to slide along the surface. Make sure that the blades are correctly installed. Now that you have all the necessary features installed, you can begin making furniture. Next, you are ready to start using your scroll saw.
Dust blower
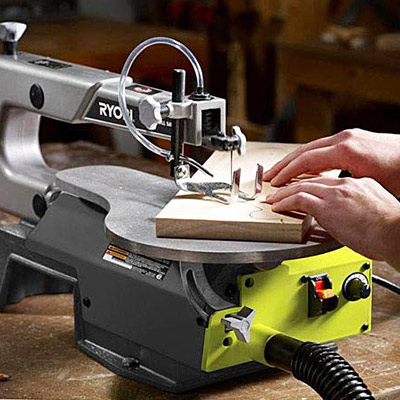
General International 21" Tilting Head Scroll Saw includes solid upper arms and lower parallel arm for stable operation. The saw also has a dust collector hookup so that you can collect any sawdust while you work. This saw makes detailed cuts without producing excessive noise, and features a dust blower that's easily adjustable for various air flow directions. If you own a shopvac, you can use the saw to cut wood.
Tilting the table
You're here to learn how to use the scroll saw on a tilting table. Many people like to spend hours on a scroll saw, but hunching over it for extended periods can be very uncomfortable, especially if you have a stiff neck or shoulders. There are ways to make scroll saws more comfortable.
Spiral blades
A straight blade is best if you need to make straight, long cuts with your scroll saw. It can be time-consuming to switch between straight or spiral blades. However, this can make it easier and result in better results. Spiral blades offer a simple way to cut through a wide variety of materials. These blades have teeth that reach the end of the blade.
Variable speed
It is essential to choose the best scroll saw blade for you project. Scroll saw blades are available in various tooth configurations and sizes to fit various types of materials. The bigger the number, generally speaking, the more durable the blade. This is true for thicker materials. For thinner woods, smaller blades will be used. Below are some of our top-rated scroll saw blades. The best scroll saw blades will cut the thickness of the material you intend on cutting.
Transferring patterns with colored carbon paper

Before you start carving, it is a good idea to transfer the patterns onto colored carbonpaper. Place a piece carbon paper on top of the desired design and then tape the opposite side. Clear packaging tape is also an option. This eliminates the need to sand and apply adhesive remover. After you've taped your pattern onto the paper, trace the design on the carbon paper with a ballpoint pen or dull pencil. Be careful not to move the pattern papers when you are tracing. Otherwise, you might end up cutting the wrong pattern.
Keep several blades handy
Consider purchasing spare blades for beginners if you use a scroll saw. Scroll saws can be very dangerous. This is why it's crucial to adjust the tension of the blade before starting. If the blade isn’t properly tightened, it can break. It’s also a good idea for budgeting for spares. Extra blades can be purchased at your local hardware store, or online.
Use an eraser and a pencil
You can make a sketch of your design and then attach it on the scroll saw. Before you start your project, make sure to check the settings of your scroll saw. Once you've drawn your design in pencil, drill 1/4" through the middle. Then thread the blade through the hole, working gently towards the corners. You must be careful when guiding the blade to avoid any injuries.
Choose the right blade

It can be confusing when buying a scroll saw for the first time. Different blades have different specifications. If you are just starting with a scrollsaw, it might be helpful to experiment with different types to help you decide which one you like best. Each blade type is different in design and function. They are designed to be used for specific jobs. Here are a few tips for selecting the right scroll saw blade:
FAQ
How do you know which tools are the best for you?
It's important that you consider your needs and preferences while shopping for tools. Do you prefer metal handles or plastic? What size screws and nails do you use most often? Do you prefer to use hand tools or power tools?
How long does it usually take to complete a piece furniture?
It depends on which wood you choose, how complicated your design is and what amount of finishing you apply. Hardwoods are more difficult to maintain than softwoods. Hardwoods can also be more costly than softwoods. However, they are stronger and more resistant to moisture. The process of finishing a piece of furniture typically takes anywhere from one week to three months.
How much money will I need to get started?
Because each project is unique there are no exact numbers. But if you want to get an idea of how much money you'll need, consider these factors:
-
Material costs
-
Tools and equipment
-
Time spent on the Project
-
Hourly rate
-
How much profit can you anticipate to make
-
Whether you plan to hire help
You might start small if you are just starting out. You'll become more proficient as you get experience.
Statistics
- Overall employment of woodworkers is projected to grow 8 percent from 2020 to 2030, about as fast as the average for all occupations. (bls.gov)
- The U.S. Bureau of Labor Statistics (BLS) estimates that the number of jobs for woodworkers will decline by 4% between 2019 and 2029. (indeed.com)
- In 2014, there were just over 237,000 jobs for all woodworkers, with other wood product manufacturing employing 23 percent; wood kitchen cabinets and countertop manufacturing employing 21 percent. (theartcareerproject.com)
- Average lumber prices rose about 600 percent between April 2020 and May 2021. (familyhandyman.com)
External Links
How To
How to make wood joint
This tutorial will teach you how to join two pieces wood together. We will be using the "pocket-hole joint", which involves drilling holes in wood and then gluing them together. This method is great if your wood's straight and smooth. You may want to consider other methods, such as dowel joining. Here are the steps
-
Drill Pocket Hole Joints. You will need to measure and mark the exact location of your pocket hole joint. Then drill 3/4 inch deep holes into the ends of each piece of wood using a jig saw or handheld drilling machine.
-
Sand Smooth. The wood's edges can be sanded to prevent splitting.
-
Glue the two sides of the wood together. Apply glue to both the ends of the wood. Let it sit for about 5 minutes before clamping the pieces together.
-
Connect the pieces. After the glue has dried completely, you can clamp the pieces together until they are flush.
-
Trim Joinery. Trimming the joinery after glue has completely dried.
Be sure to leave enough space between each piece so that they can be turned inside-out.