For beginners, it might seem difficult to know how to add texture and dimension to your woodturning project. Here's an easy way to do it: watch Ernie Conover demonstrate the process. Textures are natural patterns that can be used to embellish objects in various ways. These textures can be used to enhance your project's personality and design. You have many options to add texture to your project: a salt shaker, bottle stopper or a stackable ring bowl.
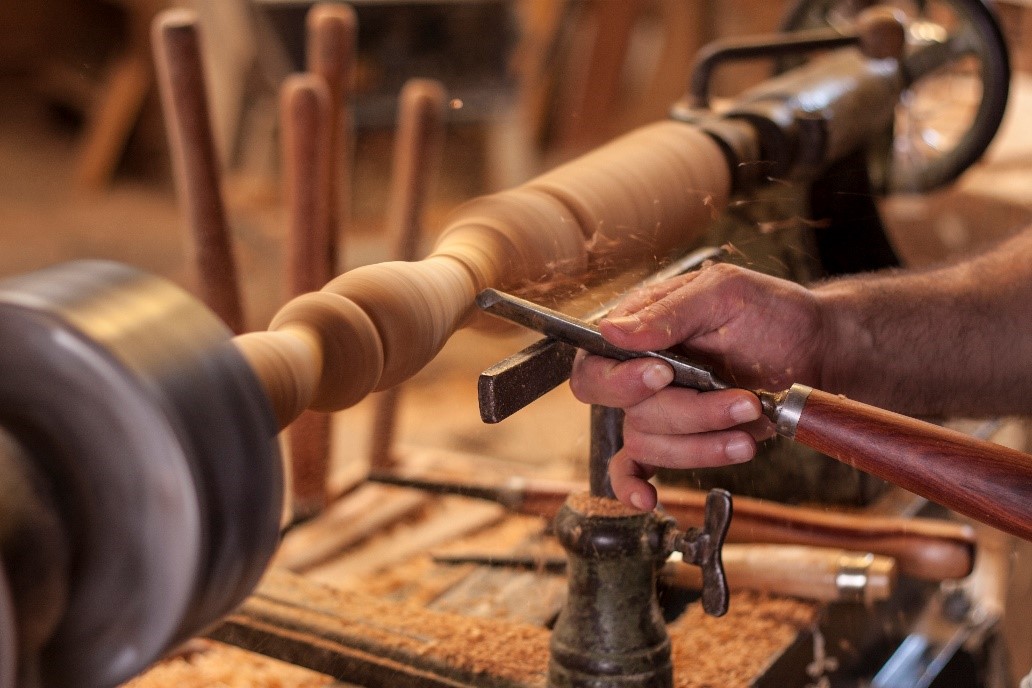
Making a rolling Pin
Perhaps you have been interested in woodturning and wondered how to make your own rolling pin. Wood rolling nails are typically long and made out of straight, unblemished wood. You can use any hardwood for the pin depending on its length. But hard maple, cherry wood, apple wood, and ash are all good choices. There are also cheaper versions that can be made out of soft maple and/or birch. But it is crucial to select the right type of wood for the task.
To begin, measure the diameter of the handle and the diameter of the rolling pin. Use the Parting Tool to measure the diameter and then use the Roughing Gouge to skim down the handle length to its diameter. After sizing the diameter, use the Bowl Gouge to make the rolling pin's curves. This will allow to you to thread the pin. Once your rolling-pin is complete, apply a foodsafe finish and let it dry on a tray for 15 minutes.
Making a salt/pepper shaker
There are many ways you can make these handy utensils. A mason jar, for example, can be used to create a beautiful salt-and-pepper shaker. Use a small nail file and hammer to gently punch holes between the letters. You will need to leave 5/8 inches of wood at each end. Place a cork through these holes. Enjoy your creation by filling the shaker with salt.
You might have a collection of Coca-Cola bottles lying around your home that aren't being used, and you can use these bottles to make a salt-and-pepper shakeer. Tape can be used to clean the bottle's lines or metallic gold leaf paint can be used to give it a more detailed look. You can also use any other colour of all surface paint.
Make a bottle-stopper

A bottle stopper can be made in a few simple steps. The first is to mount the blank between 2 centers. This will produce a collet which can be used to mount the chuck. Once you have the collet, you can turn the piece to make your desired shape. After that, you will turn a threaded post to attach the decorative turned part to the bottle. You can use different sizes of threaded posts.
It is crucial to select the right type of wood before you begin the process. You can buy blanks from a craft store. Although the blanks are already squared, if the blanks are cut by you, make sure they are perfectly square. If you are buying wood from a retail store, you might need to square it up. Instead, you can use a tablesaw and chop saw. If you have an odd-shaped piece, use a clamp to help you square up the wood. Finally, sand the stopper with a fine-grit sandpaper to make the finish smooth and even.
How to make a stacked bowl ring.
If you are making a stacked rings bowl for woodworking, it is possible to create a large bowl from two or more flat board pieces by creating concentric rings out of them. The rings are normally glued together using butt joints, but sliding dovetail joints can be added interest. The boards should measure five inches wide by one inch thick. Each board's faces have been joined and the join edge has been planed.

You can cut a segmented ring bowl using a jig or trammel. The board thickness will determine how many layers are needed to reach the desired height. One-inch thickness is recommended, but not thinner than 5/8'" or 3/4". You can also use a circle-drawing jig or trammel to mark the band saw lines.
FAQ
What would you recommend as a starting material for woodworking?
Start off with softwood like pine and poplar. When you feel confident with these two, move on towards hardwood.
Which wooden items are very popular?
These wooden products are the most popular. They were made from sustainably harvested wood.
Most furniture is made from oak, maple, mahogany or walnut.
These woods not only have great strength, but also beautiful patterns and colors. They also last for many years if cared for properly.
To prevent moisture damage to wood furniture, it is important that it be painted before any other surfaces. This covers all surfaces, drawers included, as well as doors and handles.
Choose a paint with water resistance if you want furniture to last as long possible.
Use a high-quality, oil-based primer and two coats of topcoat. It is possible to apply multiple coats depending on how heavy the wear.
Spray cans and aerosol spray paints are not recommended. These products contain solvents which evaporate quickly and leave behind harmful fumes.
How much should a hobbyist invest to get started?
A lot of capital is required to purchase the necessary supplies and tools if you want to start your own woodworking shop. The best place to start is by buying a small drill press, circularsaw, circular saw or sanding machine. These items won't break the budget and aren't expensive.
Is it hard to start my own woodworking business?
It is difficult to start your own woodworking company. You will need to adhere to many legal requirements. It doesn't mean that you have to go through the entire process of starting a business. Many people choose to join existing businesses. This will allow you to avoid paying membership fees and taxes.
What woods can be used to make furniture?
Woods are classified according to their hardness. Softwoods include cedar and pine as well as cedar and cedar. They're often used for outdoor furniture because they don't rot easily. These hardwoods include maple, mahogany and teak. They're generally used indoors because they won't weather well outdoors.
Statistics
- Overall employment of woodworkers is projected to grow 8 percent from 2020 to 2030, about as fast as the average for all occupations. (bls.gov)
- Average lumber prices rose about 600 percent between April 2020 and May 2021. (familyhandyman.com)
- The U.S. Bureau of Labor Statistics (BLS) estimates that the number of jobs for woodworkers will decline by 4% between 2019 and 2029. (indeed.com)
- Woodworkers on the lower end of that spectrum, the bottom 10% to be exact, make roughly $24,000 a year, while the top 10% makes $108,000. (zippia.com)
External Links
How To
How to properly use your handsaw
Hand saws can be used to cut wood into small pieces. These saws are most commonly used to cut wood into pieces. A hand saw is a tool made from metal or plastic which cuts material such as wood, plastics, metals, etc.
A hand saw has the advantage of being able to cut at any angle and without having to adjust the blade. The blades can also be sharpened easily, which is not possible with power tools. There are also some drawbacks. You must be careful when transporting them, as they can be heavy and bulky. It is possible to injure or damage your own body if the instructions are not clear.
There are many ways that you can use a handsaw. While cutting, it is important to keep your hands clear of the blades. If you don't, you might get hurt. To hold the saw properly, your thumb should be in contact with the blade. This ensures that the blade is not accidentally touched.
Never place anything under a piece of wood that you're cutting with a handsaw. This could cause the blade to slip from the wood's surface. Before you begin cutting, make sure to inspect the area. Make sure no nails or screws are hidden beneath the wood.
Safety goggles should be worn when using a handsaw. They keep dust out of your eyes, making it easier for you see what you are doing. Safety glasses protect your face against flying debris, which is another reason they are useful.
To work safely with a handheld saw, you need to first be able to operate it. Then, practice until you feel confident enough to start cutting things. Once you've mastered the basics, you'll find that you can easily cut almost anything!